Are you looking to impress your guests this Halloween with a dessert that’s both delicious and visually stunning? Spiderweb Crepes are the perfect solution! Did you know that themed desserts can boost engagement at gatherings by up to 25%? These delicate crepes, adorned with a charming spiderweb design, will not only satisfy your sweet tooth but also add a festive touch to your table. Let’s dive into this delightful recipe that’s sure to be a crowd-pleaser!
Ingredients List
To prepare your Spiderweb Crepes, you’ll need the following ingredients:
- All-purpose flour (1 cup): For a gluten-free version, substitute with almond flour or a gluten-free flour blend.
- Eggs (2 large): These provide structure; you can use flax eggs for a vegan option.
- Milk (1 1/2 cups): Whole milk gives the best flavor, but you can use almond or oat milk as alternatives.
- Butter (2 tablespoons, melted): This adds richness; coconut oil can be a dairy-free substitute.
- Sugar (1 tablespoon): For a touch of sweetness; adjust to taste.
- Vanilla extract (1 teaspoon): Adds depth of flavor; almond extract can be a fun alternative.
- Chocolate sauce (for spiderweb design): Store-bought or homemade, depending on your preference.
- Whipped cream (for serving): Fresh whipped cream enhances the presentation.
Step-by-Step Instructions
Step 1: Prepare the Crepe Batter
In a mixing bowl, whisk together the flour, eggs, milk, melted butter, sugar, and vanilla extract until smooth. Let the batter rest for about 10 minutes to allow the gluten to relax, which will result in more tender crepes.
Step 2: Heat the Pan
Heat a non-stick skillet over medium heat. Lightly grease it with butter or oil. You want the pan hot enough so that a drop of water sizzles when it hits the surface.
Step 3: Cook the Crepes
Pour about 1/4 cup of batter into the skillet, swirling it around to form a thin layer. Cook for about 1-2 minutes until the edges start to lift and the bottom is lightly golden. Flip the crepe and cook for another minute. Repeat this process until all the batter is used, stacking the crepes on a plate.
Step 4: Create the Spiderweb Design
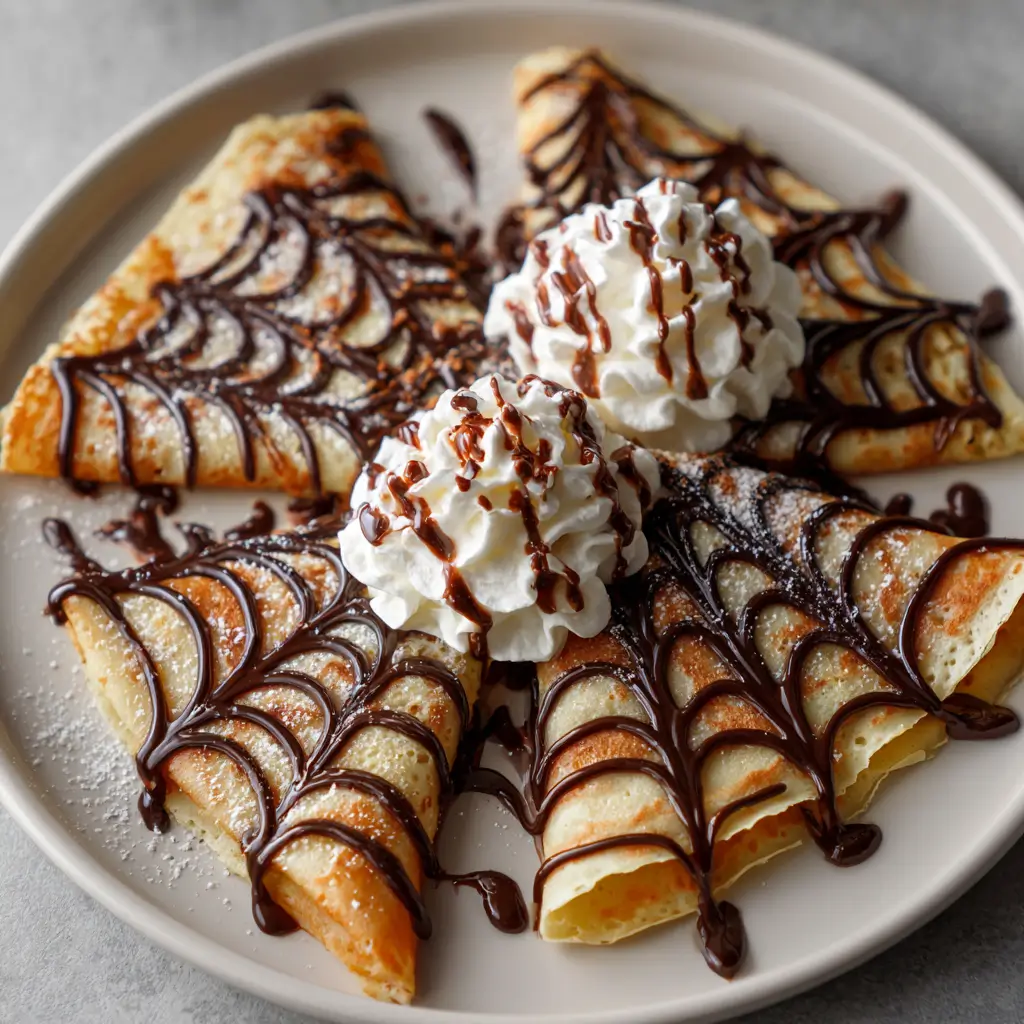
Once the crepes are cooked, it’s time to create the spiderweb design. Place a crepe on a serving plate. Using a squeeze bottle or a spoon, drizzle chocolate sauce in a spiral pattern, starting from the center and working your way out. Then, use a toothpick or a skewer to drag lines from the center to the outer edge, creating a spiderweb effect.
Step 5: Serve the Crepes
Top the spiderweb crepes with a dollop of whipped cream and an optional sprinkle of powdered sugar for an extra touch of sweetness. You can also add a few chocolate spiders or other Halloween-themed decorations for fun!
Nutritional Information
Here’s a breakdown of the nutritional information for one serving of Spiderweb Crepes (based on a recipe serving four):
- Calories: 220
- Protein: 6g
- Fat: 9g
- Carbohydrates: 30g
- Fiber: 1g
- Sugar: 5g
These crepes are a delightful treat that can fit into a balanced diet when enjoyed in moderation.
Healthier Alternatives for the Recipe
If you want to make your Spiderweb Crepes a bit healthier, consider these alternatives:
- Whole Wheat Flour: Swap all-purpose flour for whole wheat flour to increase fiber content.
- Reduced Sugar: Cut back on sugar or use a natural sweetener like honey or maple syrup.
- Fruit Fillings: Instead of whipped cream, try filling the crepes with fresh fruit or Greek yogurt for added nutrition.
Serving Suggestions
To make your Spiderweb Crepes even more appealing, consider these serving suggestions:
- Themed Presentation: Serve the crepes on Halloween-themed plates or platters to enhance the festive atmosphere.
- Accompaniments: Pair with a side of fresh berries or a scoop of ice cream for a more indulgent dessert.
- Creative Toppings: Experiment with different toppings like caramel sauce, nuts, or even a sprinkle of cinnamon for added flavor.
Common Mistakes to Avoid
When preparing your Spiderweb Crepes, keep these common pitfalls in mind:
- Overmixing the Batter: This can lead to tough crepes. Mix just until combined for the best texture.
- Not Heating the Pan Enough: Ensure the skillet is at the right temperature to avoid soggy crepes.
- Skipping the Resting Time: Allowing the batter to rest is crucial for achieving tender crepes.
Storing Tips for the Recipe
If you have leftovers, here’s how to store them:
- Refrigeration: Store any leftover crepes in an airtight container in the refrigerator for up to 3 days.
- Freezing: For longer storage, freeze individual crepes separated by parchment paper. They can last up to 2 months.
- Reheating: To reheat, simply warm them in a skillet over low heat or in the microwave for a few seconds.
Conclusion
Spiderweb Crepes are a delightful Halloween treat that combines elegance and fun. With their delicate texture and spooky presentation, they are sure to impress your guests. Try this recipe today, and don’t forget to share your feedback in the comments or subscribe for more exciting updates!
FAQs
Can I make the crepes ahead of time?
Yes! You can prepare the crepes in advance and store them in the refrigerator or freezer until you’re ready to serve.
What can I use instead of chocolate sauce?
Feel free to use caramel sauce, fruit compote, or even a flavored syrup to create your spiderweb design.
Can I make this dish gluten-free?
Absolutely! Substitute all-purpose flour with a gluten-free flour blend to make the crepes gluten-free.

Spiderweb Crepes
Ingredients
- All-purpose flour (1 cup): For a gluten-free version, substitute with almond flour or a gluten-free flour blend.
- Eggs (2 large): These provide structure; you can use flax eggs for a vegan option.
- Milk (1 1/2 cups): Whole milk gives the best flavor, but you can use almond or oat milk as alternatives.
- Butter (2 tablespoons, melted): This adds richness; coconut oil can be a dairy-free substitute.
- Sugar (1 tablespoon): For a touch of sweetness; adjust to taste.
- Vanilla extract (1 teaspoon): Adds depth of flavor; almond extract can be a fun alternative.
- Chocolate sauce (for spiderweb design): Store-bought or homemade, depending on your preference.
- Whipped cream (for serving): Fresh whipped cream enhances the presentation.
Instructions
Step 1: Prepare the Crepe Batter
In a mixing bowl, whisk together the flour, eggs, milk, melted butter, sugar, and vanilla extract until smooth. Let the batter rest for about 10 minutes to allow the gluten to relax, which will result in more tender crepes.
Step 2: Heat the Pan
Heat a non-stick skillet over medium heat. Lightly grease it with butter or oil. You want the pan hot enough so that a drop of water sizzles when it hits the surface.
Step 3: Cook the Crepes
Pour about 1/4 cup of batter into the skillet, swirling it around to form a thin layer. Cook for about 1-2 minutes until the edges start to lift and the bottom is lightly golden. Flip the crepe and cook for another minute. Repeat this process until all the batter is used, stacking the crepes on a plate.
Step 4: Create the Spiderweb Design
Once the crepes are cooked, it’s time to create the spiderweb design. Place a crepe on a serving plate. Using a squeeze bottle or a spoon, drizzle chocolate sauce in a spiral pattern, starting from the center and working your way out. Then, use a toothpick or a skewer to drag lines from the center to the outer edge, creating a spiderweb effect.
Step 5: Serve the Crepes
Top the spiderweb crepes with a dollop of whipped cream and an optional sprinkle of powdered sugar for an extra touch of sweetness. You can also add a few chocolate spiders or other Halloween-themed decorations for fun!
Did you make this recipe?
Please leave a comment on the blog or share a photo on Facebook


