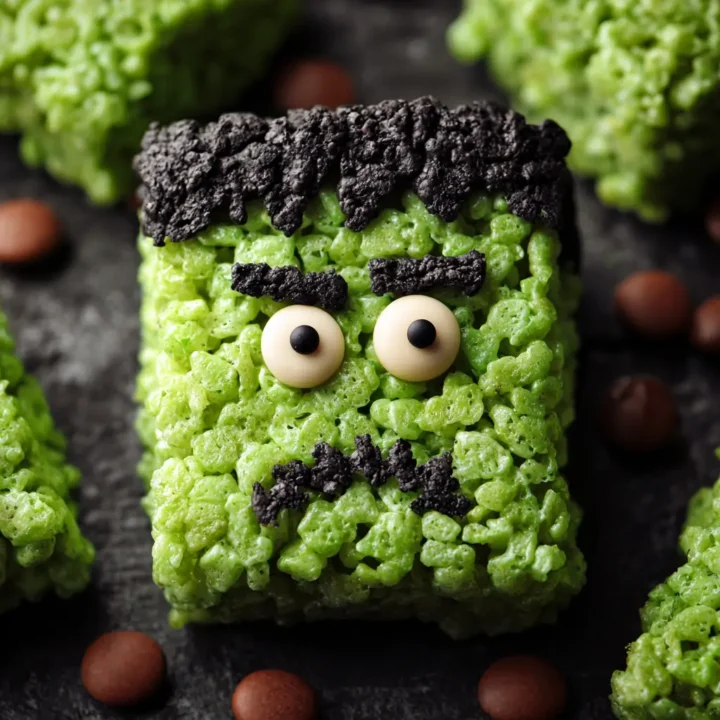
Have you ever wondered how to make Halloween treats that are not only delicious but also visually captivating? Enter Frankenstein Rice Krispie Treats—a creative twist on the classic dessert that combines nostalgia with a fun, spooky theme. These treats are perfect for parties, school events, or just a fun afternoon activity with the kids. With their vibrant green color and charmingly monstrous faces, these treats are sure to be a hit! In this blog post, we’ll guide you through everything you need to know to make these delightful treats, from ingredients to storage tips, ensuring your Halloween is as sweet as it is spooky.
Ingredients List
To create your Frankenstein Rice Krispie Treats, you will need the following ingredients:
- 6 cups Rice Krispies cereal
- 1 package (10 oz) marshmallows (or 4 cups mini marshmallows)
- 3 tablespoons butter
- Green food coloring (gel or liquid)
- Chocolate chips (for eyes and mouth)
- Black icing (for detailing)
- Wax paper (for easy handling)
Substitutions:
- Butter: You can use coconut oil for a dairy-free option.
- Marshmallows: Vegan marshmallows are available for a plant-based treat.
- Food Coloring: Natural food coloring can be used for a healthier alternative.
Step-by-Step Instructions
Step 1: Melt the Butter and Marshmallows
In a large saucepan over medium heat, melt 3 tablespoons of butter. Once melted, add 10 oz of marshmallows and stir until completely melted and smooth. This will create a gooey base for your treats.
Tip: For an extra flavor boost, consider adding a pinch of salt to enhance the sweetness.
Step 2: Add Food Coloring
Once the marshmallows are melted, remove the saucepan from heat. Add a few drops of green food coloring to the mixture, stirring until you achieve your desired shade of Frankenstein green.
Tip: Start with a small amount of food coloring and gradually add more to avoid making the mixture too dark.
Step 3: Combine with Rice Krispies
In a large mixing bowl, pour the melted marshmallow mixture over 6 cups of Rice Krispies cereal. Stir gently until all the cereal is evenly coated.
Tip: Use a spatula coated with cooking spray to prevent sticking during mixing.
Step 4: Shape the Treats
Lightly grease your hands with butter or cooking spray, then take a handful of the mixture and shape it into rectangular bars or Frankenstein heads. Place them on a sheet of wax paper to cool and set.
Tip: For a more defined shape, use a cookie cutter to cut out Frankenstein heads after the mixture has cooled slightly.
Step 5: Decorate
Once your treats are set, it’s time to bring Frankenstein to life! Use chocolate chips for the eyes and mouth, and pipe black icing to add hair and stitches.
Tip: Get creative! Use different candies for unique facial expressions.

Nutritional Information
Here’s a breakdown of the estimated nutritional content per serving (based on 12 servings):
| Nutrient | Amount per Serving |
|---|---|
| Calories | 150 |
| Protein | 1g |
| Total Fat | 4g |
| Saturated Fat | 2g |
| Carbohydrates | 28g |
| Fiber | 0g |
| Sugar | 10g |
| Sodium | 50mg |
These treats are a fun indulgence, perfect for Halloween festivities!
Healthier Alternatives for the Recipe
If you’re looking to make your Frankenstein Rice Krispie Treats a bit healthier, consider these modifications:
- Use Whole Grain Cereal: Swap Rice Krispies for a whole-grain version to increase fiber content.
- Reduce Sugar: Use less marshmallow or opt for sugar-free marshmallows.
- Add Nuts or Seeds: Incorporate chopped nuts or seeds for added nutrition and crunch.
Serving Suggestions
These Frankenstein Rice Krispie Treats are not only fun to make but also versatile in serving. Here are some creative ideas:
- Halloween Party Platter: Arrange the treats on a spooky-themed platter alongside other Halloween snacks like ghost-shaped cookies and pumpkin-shaped cheese balls.
- Individual Treat Bags: Wrap each treat in clear cellophane and tie with a ribbon for a cute party favor.
- Themed Dessert Table: Incorporate these treats into a larger dessert table with other Halloween-themed desserts for a festive display.
Common Mistakes to Avoid
While making Frankenstein Rice Krispie Treats, keep these common pitfalls in mind:
- Overheating the Marshmallows: Be careful not to overheat the marshmallows, as they can become too sticky and difficult to work with.
- Not Greasing Your Hands: If your hands aren’t greased, the mixture will stick to them, making it hard to shape the treats.
- Skipping the Wax Paper: Always use wax paper to prevent sticking and make cleanup easier.
Storing Tips for the Recipe
If you have leftovers (which is unlikely!), here’s how to store your Frankenstein Rice Krispie Treats:
- Room Temperature: Store in an airtight container at room temperature for up to 3 days.
- Refrigeration: If you want to extend their shelf life, refrigerate them for up to a week. Just be aware they may become slightly firmer.
- Freezing: For longer storage, freeze the treats in an airtight container for up to a month. Thaw at room temperature before serving.
Conclusion
In summary, Frankenstein Rice Krispie Treats are a delightful and easy Halloween treat that combines fun with flavor. With a quick preparation time and endless decorating possibilities, they are perfect for any Halloween celebration. Try the recipe today, and don’t forget to share your spooky creations in the comments or subscribe for more delicious updates!
FAQs
Q1: Can I make these treats in advance?
A1: Yes, you can prepare these treats a day or two in advance. Just store them in an airtight container to keep them fresh.
Q2: How can I make these treats gluten-free?
A2: Ensure you use gluten-free Rice Krispies and marshmallows, which are widely available.
Q3: Can I use other colors for decorating?
A3: Absolutely! Feel free to use any color food coloring to create different monsters or themes.
Frankenstein Rice Krispie Treats
Ingredients
- 6 cups Rice Krispies cereal
- 1 package (10 oz) marshmallows (or 4 cups mini marshmallows)
- 3 tablespoons butter
- Green food coloring (gel or liquid)
- Chocolate chips (for eyes and mouth)
- Black icing (for detailing)
- Wax paper (for easy handling)
- Substitutions:
- Butter: You can use coconut oil for a dairy-free option.
- Marshmallows: Vegan marshmallows are available for a plant-based treat.
- Food Coloring: Natural food coloring can be used for a healthier alternative.
Instructions
Step 1: Melt the Butter and Marshmallows
In a large saucepan over medium heat, melt 3 tablespoons of butter. Once melted, add 10 oz of marshmallows and stir until completely melted and smooth. This will create a gooey base for your treats.
Tip: For an extra flavor boost, consider adding a pinch of salt to enhance the sweetness.
Step 2: Add Food Coloring
Once the marshmallows are melted, remove the saucepan from heat. Add a few drops of green food coloring to the mixture, stirring until you achieve your desired shade of Frankenstein green.
Tip: Start with a small amount of food coloring and gradually add more to avoid making the mixture too dark.
Step 3: Combine with Rice Krispies
In a large mixing bowl, pour the melted marshmallow mixture over 6 cups of Rice Krispies cereal. Stir gently until all the cereal is evenly coated.
Tip: Use a spatula coated with cooking spray to prevent sticking during mixing.
Step 4: Shape the Treats
Lightly grease your hands with butter or cooking spray, then take a handful of the mixture and shape it into rectangular bars or Frankenstein heads. Place them on a sheet of wax paper to cool and set.
Tip: For a more defined shape, use a cookie cutter to cut out Frankenstein heads after the mixture has cooled slightly.
Step 5: Decorate
Once your treats are set, it’s time to bring Frankenstein to life! Use chocolate chips for the eyes and mouth, and pipe black icing to add hair and stitches.