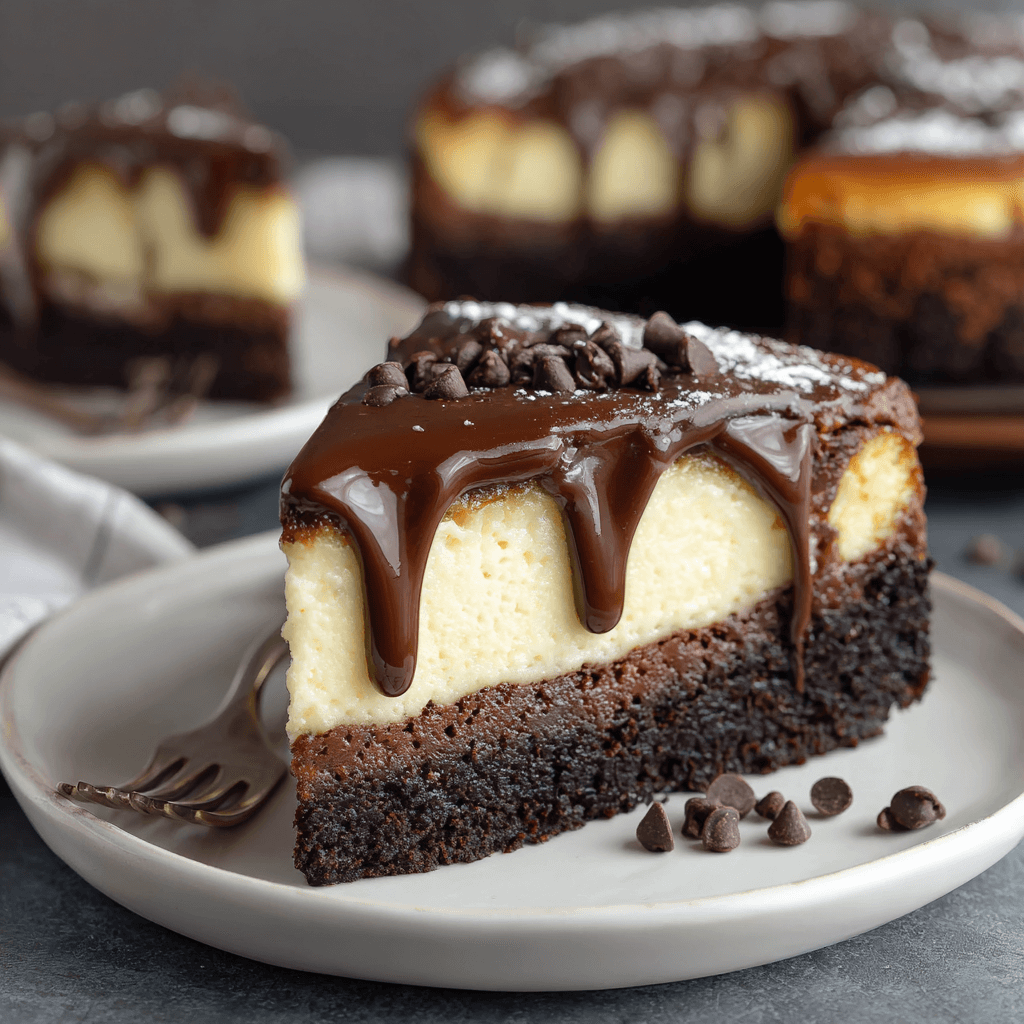
Fudgy Brownie Bottom Cheesecake is a decadent dessert that combines the rich, chocolatey goodness of brownies with a creamy cheesecake layer on top. This indulgent treat is perfect for chocolate lovers and makes an impressive addition to any gathering or celebration. With its fudgy brownie base and smooth cheesecake filling, it’s sure to become a favorite!
Ingredients List
For the Brownie Bottom:
- 1/2 cup (1 stick) unsalted butter
- 1 cup granulated sugar
- 2 large eggs
- 1 teaspoon vanilla extract
- 1/3 cup unsweetened cocoa powder
- 1/2 cup all-purpose flour
- 1/4 teaspoon salt
- 1/4 teaspoon baking powder
For the Cheesecake Filling:
- 16 ounces cream cheese, softened
- 1 cup granulated sugar
- 1 teaspoon vanilla extract
- 3 large eggs
- 1/4 cup sour cream or heavy cream
- 1/4 cup chocolate chips (optional, for extra chocolate flavor)
Timing
Preparing Fudgy Brownie Bottom Cheesecake takes about 30 minutes for prep and 1 hour for baking, plus cooling time, totaling approximately 4 hours (including chilling).
Step-by-Step Instructions
Step 1: Preheat the Oven
- Preheat Oven: Preheat your oven to 350°F (175°C). Grease a 9-inch springform pan and line the bottom with parchment paper for easy removal.
Step 2: Make the Brownie Base
- Melt Butter: In a medium saucepan, melt the butter over low heat. Remove from heat and let it cool slightly.
- Mix Ingredients: Stir in the granulated sugar, eggs, and vanilla extract until well combined. Add the cocoa powder, flour, salt, and baking powder, mixing until just combined.
- Spread in Pan: Pour the brownie batter into the prepared springform pan, spreading it evenly across the bottom.
Step 3: Bake the Brownie Layer
- Bake: Bake the brownie layer in the preheated oven for about 20 minutes, or until set but still fudgy. Remove from the oven and let it cool slightly while you prepare the cheesecake filling.
Step 4: Make the Cheesecake Filling
- Beat Cream Cheese: In a large mixing bowl, beat the softened cream cheese with an electric mixer until smooth and creamy.
- Add Sugar and Vanilla: Gradually add the granulated sugar and vanilla extract, mixing until well combined.
- Incorporate Eggs and Cream: Add the eggs one at a time, mixing on low speed after each addition until just combined. Finally, mix in the sour cream (or heavy cream) until smooth. If using, fold in the chocolate chips.
Step 5: Assemble the Cheesecake
- Pour Filling over Brownies: Pour the cheesecake filling over the slightly cooled brownie layer, spreading it evenly.
- Bake: Bake in the preheated oven for an additional 30-35 minutes, or until the center is set but still slightly jiggly. The edges should be firm.
Step 6: Cool and Chill
- Cool: Remove the cheesecake from the oven and let it cool in the pan at room temperature for about 30 minutes.
- Chill: Cover the cheesecake and refrigerate for at least 3 hours, or overnight for the best flavor and texture.
Step 7: Serve
- Remove from Pan: Carefully remove the sides of the springform pan.
- Slice and Enjoy: Slice the cheesecake and serve chilled. You can top it with whipped cream, chocolate sauce, or fresh berries if desired.
Nutritional Information
Here’s a quick glance at the nutritional profile of Fudgy Brownie Bottom Cheesecake (per slice, assuming 12 servings):
| Nutrient | Amount per Slice |
|---|---|
| Calories | 350 |
| Protein | 6g |
| Fat | 22g |
| Carbohydrates | 36g |
| Fiber | 1g |
Tips for Customization
- Flavor Variations: Add a splash of espresso or flavored extracts (like almond or mint) to the cheesecake layer for extra flavor.
- Swirl: For a marbled effect, reserve some brownie batter and swirl it into the cheesecake before baking.
- Topping Options: Experiment with different toppings such as fresh fruit, caramel sauce, or nuts.
Serving Suggestions
Fudgy Brownie Bottom Cheesecake pairs well with:
- A scoop of vanilla ice cream.
- A cup of coffee or espresso.
- A side of fresh berries for a fruity contrast.
Common Mistakes to Avoid
- Overbaking: Keep a close eye on the baking time to prevent the cheesecake from cracking or drying out.
- Not Cooling Properly: Allow the brownie layer to cool slightly before adding the cheesecake mixture to ensure the layers stay distinct.
- Skipping Chilling Time: Chilling the cheesecake is essential for the best texture and flavor.
Storing Tips for the Recipe
Fudgy Brownie Bottom Cheesecake can be stored in an airtight container in the refrigerator for up to 5 days. It can also be frozen for up to 2 months; just wrap it tightly in plastic wrap and foil before freezing.
Conclusion
In about 4 hours, you can create a rich and indulgent Fudgy Brownie Bottom Cheesecake that’s perfect for any occasion. This dessert is a delightful blend of flavors and textures, making it a favorite for chocolate lovers!
FAQs
Can I make this cheesecake ahead of time?
Absolutely! This cheesecake is great for making ahead. It can be prepared a day or two in advance.
Can I use low-fat cream cheese?
Yes, but keep in mind that the texture and flavor may differ slightly.
What if I don’t have a springform pan?
You can use a regular cake pan, but be sure to line it with parchment paper for easier removal.
Can I customize the recipe?
Definitely! Feel free to experiment with flavors and toppings to suit your taste preferences.
Fudgy Brownie Bottom Cheesecake Recipe
Ingredients
- For the Brownie Bottom:
- • 1/2 cup (1 stick) unsalted butter
- • 1 cup granulated sugar
- • 2 large eggs
- • 1 teaspoon vanilla extract
- • 1/3 cup unsweetened cocoa powder
- • 1/2 cup all-purpose flour
- • 1/4 teaspoon salt
- • 1/4 teaspoon baking powder
- For the Cheesecake Filling:
- • 16 ounces cream cheese, softened
- • 1 cup granulated sugar
- • 1 teaspoon vanilla extract
- • 3 large eggs
- • 1/4 cup sour cream or heavy cream
- • 1/4 cup chocolate chips (optional, for extra chocolate flavor)
Instructions
Step 1: Preheat the Oven
- Preheat your oven to 350°F (175°C). Grease a 9-inch springform pan and line the bottom with parchment paper for easy removal.
Step 2: Make the Brownie Base
- In a medium saucepan, melt the butter over low heat. Remove from heat and let it cool slightly.
- Stir in the granulated sugar, eggs, and vanilla extract until well combined.
- Add the cocoa powder, flour, salt, and baking powder, mixing until just combined.
- Pour the brownie batter into the prepared springform pan, spreading it evenly across the bottom.
Step 3: Bake the Brownie Layer
- Bake the brownie layer in the preheated oven for about 20 minutes, or until set but still fudgy.
- Remove from the oven and let it cool slightly while you prepare the cheesecake filling.
Step 4: Make the Cheesecake Filling
- In a large mixing bowl, beat the softened cream cheese with an electric mixer until smooth and creamy.
- Gradually add the granulated sugar and vanilla extract, mixing until well combined.
- Add the eggs one at a time, mixing on low speed after each addition until just combined.
- Mix in the sour cream (or heavy cream) until smooth.
- If using, fold in the chocolate chips.
Step 5: Assemble the Cheesecake
- Pour the cheesecake filling over the slightly cooled brownie layer, spreading it evenly.
- Bake in the preheated oven for an additional 30–35 minutes, or until the center is set but still slightly jiggly. The edges should be firm.
Step 6: Cool and Chill
- Remove the cheesecake from the oven and let it cool in the pan at room temperature for about 30 minutes.
- Cover the cheesecake and refrigerate for at least 3 hours, or overnight for the best flavor and texture.
Step 7: Serve
- Carefully remove the sides of the springform pan.
- Slice the cheesecake and serve chilled.
- Top with whipped cream, chocolate sauce, or fresh berries if desired.