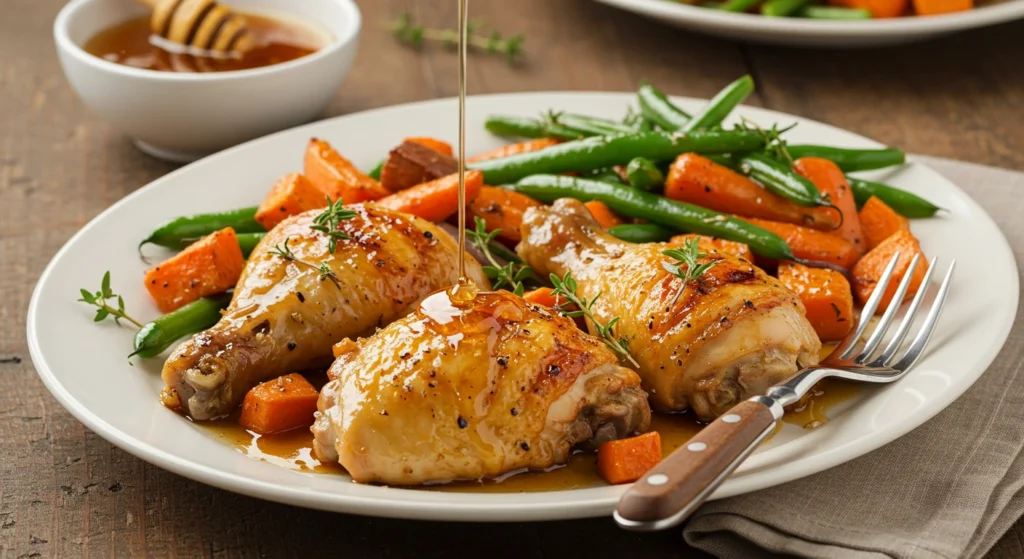
Honey-glazed chicken is a timeless dish that brings people together, whether it’s for a festive holiday meal, a casual family dinner, or an intimate gathering with friends. The magic lies in its perfect balance of flavors: the sweetness of honey, the savory depth of soy sauce, and the tangy brightness of lemon juice. With its golden, caramelized exterior and juicy, tender meat, this dish is not only delicious but also incredibly versatile.
This guide will take you through the entire process of making honey-glazed chicken, step by step. Whether you’re a novice cook or a seasoned pro, you’ll learn tips, tricks, and variations to help you master this recipe and make it your own. By the end, you’ll have a dish that’s destined to become a family favorite.
Table of Contents
Why Honey-Glazed Chicken Is a Must-Try Recipe
Food has a way of creating memories and strengthening bonds, and honey-glazed chicken is no exception. Its universal appeal makes it suitable for any occasion, and its simplicity means you don’t have to spend hours in the kitchen to make something truly special.

The Appeal of Honey-Glazed Chicken
- Flavor Harmony: The sweetness of honey contrasts beautifully with the savory, umami-rich notes of the chicken, while lemon juice adds a bright, tangy kick.
- Easy Preparation: With just a few simple ingredients and straightforward steps, this dish is approachable for cooks of all skill levels.
- Crowd-Pleaser: From picky kids to discerning adults, everyone loves the taste of honey-glazed chicken.
- Customizable: You can adjust the sweetness, spice, or tang to suit your personal preferences.
Ingredients for Honey-Glazed Chicken
Before diving into the cooking process, it’s essential to gather all your ingredients. Each component plays a crucial role in creating the perfect balance of flavors.
Ingredient Table
| Ingredient | Quantity | Notes |
|---|---|---|
| Chicken thighs/drumsticks | 6 pieces | Bone-in for enhanced flavor |
| Honey | 3 tbsp | Opt for raw or local honey |
| Soy sauce | 2 tbsp | Adds depth and umami |
| Garlic | 3 cloves, minced | Fresh garlic is best |
| Lemon juice | 1 tbsp | Provides a tangy balance |
| Olive oil | 2 tbsp | For searing the chicken |
| Paprika | 1 tsp | Optional, for smoky flavor |

Step-by-Step Instructions
Let’s break down the process of making honey-glazed chicken into manageable steps. Follow these instructions to ensure your dish turns out perfectly every time.
1. Preparing the Chicken
- Clean and Dry: Rinse the chicken pieces under cold water and pat them completely dry with paper towels. Dry chicken sears better and helps the glaze adhere properly.
- Season Generously: Rub the chicken with salt, pepper, and paprika. This simple seasoning enhances the flavor of the meat and complements the glaze.
2. Making the Honey Glaze
- In a medium-sized bowl, combine honey, soy sauce, minced garlic, and lemon juice.
- Whisk the ingredients together until the mixture is smooth and well blended. Taste the glaze and adjust as needed; add more honey for sweetness or more lemon juice for tanginess.
3. Cooking the Chicken
- Sear the Chicken:
- Heat olive oil in a large skillet over medium heat.
- Add the chicken pieces, skin-side down, and cook until golden brown, about 3-4 minutes per side. This step locks in the juices and creates a crispy exterior.
- Add the Glaze:
- Pour the honey glaze over the chicken, ensuring all pieces are evenly coated.
- Reduce the heat to low, cover the skillet, and let the chicken simmer for 20-25 minutes.
- Baste and Reduce:
- Periodically spoon the glaze over the chicken to build layers of flavor.
- Remove the lid during the last 5 minutes of cooking to allow the glaze to thicken and caramelize.
4. Serve and Enjoy
- Transfer the chicken to a serving platter, drizzle with the remaining glaze, and garnish with fresh parsley or sesame seeds for added texture and visual appeal.

Pro Tips for Perfect Honey-Glazed Chicken
- Marinate for Maximum Flavor: If you have extra time, marinate the chicken in the glaze for 2-4 hours before cooking. This allows the flavors to penetrate deeper into the meat.
- Use Bone-In Chicken: Bone-in thighs and drumsticks are juicier and more flavorful than boneless cuts.
- Cook Over Low Heat: Keeping the heat low during simmering prevents the glaze from burning and ensures the chicken cooks evenly.
- Experiment with Add-Ons: Add a pinch of chili flakes for heat or a splash of apple cider vinegar for extra tang.
Side Dishes to Complement Honey-Glazed Chicken
Every great main dish deserves equally delicious accompaniments. Here are some side dish ideas that pair beautifully with honey-glazed chicken:
Vegetables
- Roasted Brussels Sprouts: Toss with olive oil, salt, and pepper, and roast until crispy.
- Steamed Green Beans: A simple and fresh side that balances the richness of the chicken.
Starches
- Mashed Potatoes: Creamy potatoes are the perfect base for soaking up the flavorful glaze.
- Steamed Rice: Fluffy white or brown rice complements the dish’s sweet and savory flavors.
Bread
- Crusty Dinner Rolls: Use these to mop up every last drop of the glaze.
- Garlic Bread: Adds a bold, garlicky punch to the meal.
Frequently Asked Questions (FAQ)
Q: Can I use chicken breasts instead of thighs or drumsticks?
Yes, chicken breasts are a great alternative. Just be mindful of the cooking time, as they can dry out more quickly than dark meat.
Q: Can I make honey-glazed chicken in the oven?
Absolutely. Preheat your oven to 375°F (190°C), place the chicken in a baking dish, pour the glaze over it, and bake for 30-35 minutes. Baste halfway through for the best results.
Q: What’s the best way to store leftovers?
Store leftover chicken in an airtight container in the refrigerator for up to three days. Reheat gently in a skillet or microwave to preserve the glaze.
Q: Can I make this dish ahead of time?
Yes, you can prepare the chicken and glaze in advance. Cook the dish just before serving to ensure the best texture and flavor.
Conclusion: Make Honey-Glazed Chicken a Part of Your Family Tradition
Honey-glazed chicken is more than just a meal—it’s an experience. From the aroma that fills your kitchen as it cooks to the smiles on your family’s faces as they take their first bite, this dish has a way of creating lasting memories.
Call-to-Action
Now it’s your turn to bring this recipe to life. Gather your ingredients, follow the steps, and enjoy the satisfaction of creating a dish that’s sure to become a staple in your household. Once you’ve tried it, don’t forget to share your success story in the comments below. Happy cooking!

How to Make Honey-Glazed Chicken
Savor the delicious flavor of honey-glazed chicken—crispy on the outside, tender on the inside, and covered in a sweet, golden glaze!
Ingredients
- 6 bone-in chicken thighs or drumsticks
- 3 tbsp honey (preferably raw or local)
- 2 tbsp soy sauce
- 3 cloves garlic, minced
- 1 tbsp lemon juice
- 2 tbsp olive oil (for searing)
- 1 tsp paprika (optional, for smoky flavor)
Instructions
Notes
- Storage: Store leftovers in an airtight container for up to 3 days.
- Customization: Feel free to adjust the glaze sweetness with more or less honey, and add chili flakes for a spicy twist.
Did you make this recipe?
Please leave a comment on the blog or share a photo on Facebook
What do you think of these recipes?
There are no reviews yet. Be the first one to write one.

