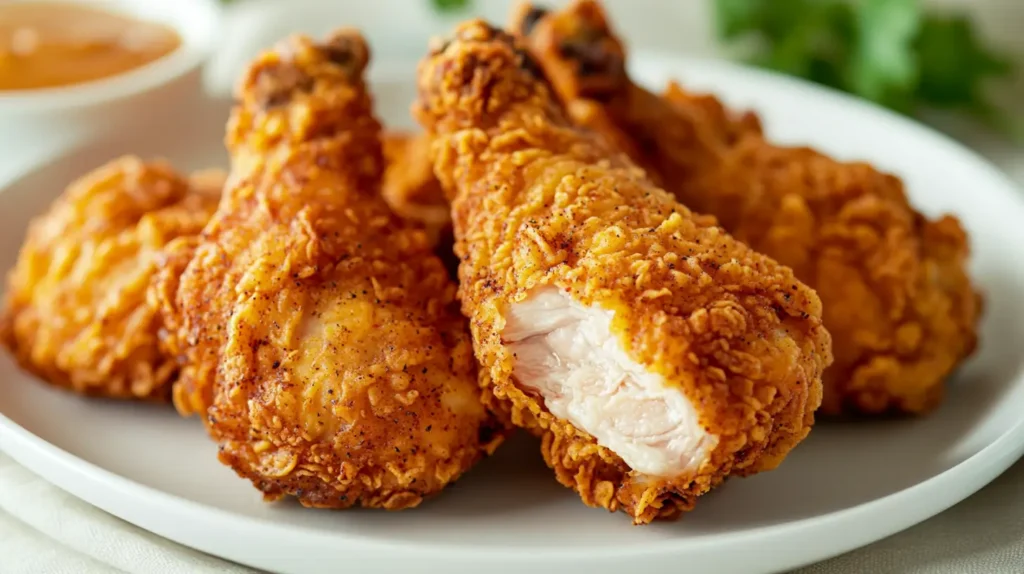
Missing buttermilk but craving crispy fried chicken? I’ve got you covered! This recipe delivers that golden, crunchy coating and juicy interior without the traditional buttermilk soak. Using simple brining techniques and a flavorful seasoning blend, we’ll create Southern-style chicken that’s every bit as delicious as the classic version. Perfect for when you’re out of ingredients or avoiding dairy, this method proves you don’t need buttermilk for incredible fried chicken!
JUMP TO SECTION
INGREDIENTS FOR Fried Chicken Without the Buttermilk
For the Chicken Brine:
- 4 pounds chicken pieces (thighs, drumsticks, wings, or breasts)
- 2 cups cold water
- 2 tablespoons kosher salt
- 1 tablespoon white vinegar (the acid that replaces buttermilk’s tang)
- 1 teaspoon sugar
- 3 cloves garlic, smashed
- 1 bay leaf
For the Seasoned Flour Coating:
- 2 cups all-purpose flour
- 1 tablespoon paprika
- 2 teaspoons garlic powder
- 2 teaspoons onion powder
- 1½ teaspoons black pepper
- 1 teaspoon dried thyme
- 1 teaspoon dried oregano
- 1 teaspoon cayenne pepper (adjust to your heat preference)
- 2 teaspoons salt
For the Egg Wash:
- 2 large eggs
- ¼ cup water
- 1 tablespoon hot sauce (optional, but adds great flavor)
For Frying:
- Vegetable oil, peanut oil, or canola oil (enough to fill your pan 1-2 inches deep)
The beauty of this recipe is its flexibility. No buttermilk? No problem! The vinegar in our brine creates that same tenderizing effect, while our carefully balanced seasoning blend ensures you won’t miss a thing flavor-wise. I’ve tested these proportions extensively to achieve that perfect balance of crispiness and juiciness that makes fried chicken so irresistible.

Step-by-Step Instructions for Fried Chicken Without the Buttermilk
1. Prepare the Brine:
- In a large bowl, combine cold water, kosher salt, white vinegar, sugar, smashed garlic, and bay leaf.
- Stir until salt and sugar completely dissolve.
- Add chicken pieces, making sure they’re fully submerged.
- Cover and refrigerate for at least 4 hours (overnight is even better for maximum flavor infusion).
2. Set Up Your Dredging Station:
- Remove chicken from the brine and pat thoroughly dry with paper towels.
- In a large bowl, whisk together eggs, water, and hot sauce (if using).
- In another bowl, combine flour with all seasoning ingredients, mixing well.
- Arrange your station in order: chicken, seasoned flour, egg wash, and seasoned flour again.
3. Double Dredge for Extra Crispiness:
- Working with one piece at a time, coat chicken in seasoned flour, shaking off excess.
- Dip into egg wash, allowing excess to drip off.
- Return to seasoned flour for a second coating, pressing gently to adhere.
- Place dredged pieces on a wire rack and let rest for 15 minutes (this helps the coating stick).
4. Heat Your Oil:
- Pour oil into a large, heavy-bottomed pan or Dutch oven to a depth of 1-2 inches.
- Heat oil to 350°F (175°C) – use a thermometer for accuracy.
- Maintaining proper oil temperature is crucial for perfect frying.
5. Fry in Batches:
- Carefully lower 3-4 pieces of chicken into the hot oil (don’t overcrowd).
- Fry larger pieces (breasts, thighs) for 12-14 minutes, turning halfway.
- Smaller pieces (wings, drumsticks) need about 10-12 minutes.
- Look for a deep golden-brown color and an internal temperature of 165°F (74°C).
6. Drain and Rest:
- Remove fried pieces to a clean wire rack over a baking sheet.
- Allow to drain and rest for 5-10 minutes before serving.
- This resting period helps lock in juices and maintain crispiness.
The double dredging method creates those delicious craggy bits of extra-crispy coating, while the vinegar-based brine ensures tender, flavorful meat without buttermilk. Keep an eye on your oil temperature throughout the process – it’s the secret to achieving that perfect golden crust without burning.
ADDITIONAL TIPS & RECIPE VARIATIONS FOR Fried Chicken Without the Buttermilk
Pro Tips for Perfect Results:
- Use a deep-fry thermometer to maintain oil at 350°F for ideal crispiness
- Let dredged chicken rest for 15-30 minutes before frying for a better coating
- Pat chicken completely dry before dredging to prevent the coating from falling off
- Use tongs and be careful when turning chicken to preserve the coating
- Always let chicken rest after frying to maintain juiciness
Exciting Variations:
- Spicy Version: Double the cayenne in the flour mixture and add hot sauce to the egg wash
- Herb-Infused: Add 2 tablespoons of fresh herbs like thyme, rosemary, and parsley to the flour
- Gluten-Free Option: Substitute all-purpose flour with a 1:1 gluten-free flour blend
- Air Fryer Method: Spray dredged chicken with oil and air fry at 380°F for 12-15 minutes per side
- Lemon Pepper: Add 1 tablespoon lemon zest and 2 teaspoons black pepper to your flour mixture
Make-Ahead Solutions:
- Brine chicken up to 24 hours in advance
- Pre-mix seasoned flour and store in an airtight container
- Reheat leftover chicken in a 350°F oven for 15-20 minutes to restore crispiness
The vinegar-based brine works just as effectively as buttermilk to tenderize the meat while the double-dredging technique ensures that perfect crispy exterior we all crave in great fried chicken.
FAQ:
What if you don’t have buttermilk for fried chicken?
You can use a vinegar-based brine as shown in this recipe, which tenderizes the chicken just as effectively. Alternatively, mix 1 tablespoon of vinegar or lemon juice with 1 cup of regular milk and let it sit for 5-10 minutes to create a quick buttermilk substitute.
How do you keep buttermilk fried chicken breading?
Let the dredged chicken rest for 15-30 minutes before frying to help the coating adhere better. Maintain proper oil temperature (350°F), and only turn the chicken once during cooking. Pat the chicken completely dry before dredging, and use the double-dredging technique described in this recipe.
Why is buttermilk important for fried chicken?
Buttermilk traditionally tenderizes chicken through its acidity and adds a tangy flavor. However, the vinegar in our brine serves the same tenderizing purpose by breaking down proteins, while our seasoning blend provides all the flavor you need without buttermilk.
How do you fry chicken without deep frying it?
You can shallow fry in just 1-2 inches of oil, air fry at 380°F for 12-15 minutes per side, oven “fry” by baking breaded chicken at 425°F for 30-40 minutes, or pan-sear and then finish in a 375°F oven. Each method uses less oil while still creating crispy chicken.

Fried Chicken Without Buttermilk
Ingredients
- 4 pounds chicken pieces (thighs, drumsticks, wings, or breasts)
- 2 cups cold water
- 2 tablespoons kosher salt
- 1 tablespoon white vinegar
- 1 teaspoon sugar
- 3 cloves garlic, smashed
- 1 bay leaf
- For the Seasoned Flour Coating:
- 2 cups all-purpose flour
- 1 tablespoon paprika
- 2 teaspoons garlic powder
- 2 teaspoons onion powder
- 1½ teaspoons black pepper
- 1 teaspoon dried thyme
- 1 teaspoon dried oregano
- 1 teaspoon cayenne pepper
- 2 teaspoons salt
- For the Egg Wash:
- 2 large eggs
- ¼ cup water
- 1 tablespoon hot sauce (optional)
- For Frying:
- Vegetable oil, peanut oil, or canola oil
Instructions
- Combine brine ingredients and submerge the chicken. Refrigerate 4+ hours.
- Pat chicken dry. Prepare dredging station: seasoned flour, egg wash, more seasoned flour.
- Double-dredge each piece and rest for 15 minutes on a wire rack.
- Heat oil to 350°F in a Dutch oven or heavy pan.
- Fry in batches for 12-14 minutes (large pieces) or 10-12 minutes (small pieces), turning once.
- Drain on a wirea rack and rest 5-10 minutes before serving.
Notes
- Maintain oil temperature at 350°F for best results
- For extra crispiness, let dredged chicken rest longer before frying
- Chicken should reach internal temperature of 165°F
- Store leftovers in refrigerator up to 3 days
Nutrition Information:
Amount Per Serving: Calories: 400

What do you think of these recipes?
There are no reviews yet. Be the first one to write one.