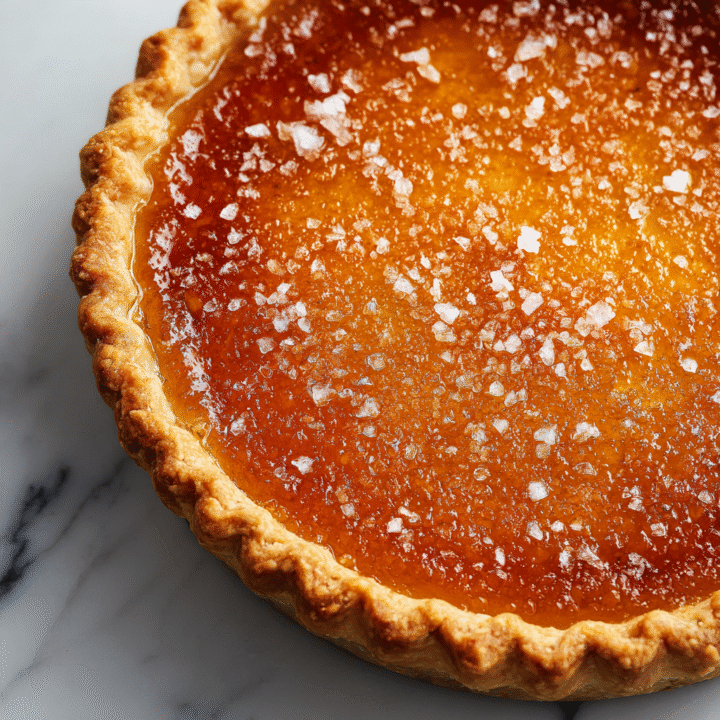
Have you ever craved a dessert that perfectly balances sweetness with a hint of saltiness? If so, you’re in for a treat! Salted Honey Pie is a unique dessert that combines the rich flavors of honey with a touch of sea salt, creating a delectable treat that will tantalize your taste buds. According to recent surveys, honey desserts are becoming increasingly popular, with a 30% rise in searches for honey-based recipes over the past year. This pie is not only easy to make but also a delightful way to impress your guests at any gathering. Let’s dive into this delicious recipe!
Ingredients List
To create your Salted Honey Pie, gather the following ingredients:
For the Crust:
- 1 ½ cups graham cracker crumbs
- 1/3 cup granulated sugar
- 1/2 cup unsalted butter, melted
- 1/4 teaspoon salt
For the Filling:
- 1 cup honey (preferably local or wildflower)
- 3 large eggs
- 2 tablespoons all-purpose flour
- 1 teaspoon vanilla extract
- 1/4 teaspoon sea salt
- 1 tablespoon unsalted butter, melted
- 1/2 cup heavy cream (optional for a creamier texture)
For Topping:
- Flaky sea salt for garnish
- Fresh herbs like thyme or rosemary (optional, for a sophisticated touch)
Substitution Suggestions:
- Graham cracker crumbs: Use crushed digestive biscuits or almond flour for a gluten-free option.
- Honey: Maple syrup can be used as a substitute for a different flavor profile.
Step-by-Step Instructions
Step 1: Prepare the Crust
- Preheat your oven to 350°F (175°C).
- In a medium bowl, combine graham cracker crumbs, sugar, melted butter, and salt. Mix until well combined.
- Press the mixture firmly into the bottom and up the sides of a 9-inch pie pan. Bake for 8-10 minutes until lightly golden. Set aside to cool.
Step 2: Make the Filling
- In a large mixing bowl, whisk together the honey, eggs, flour, vanilla extract, sea salt, and melted butter until smooth.
- If using heavy cream, gently fold it into the mixture for a creamier texture.
Step 3: Assemble the Pie
- Pour the honey filling into the cooled crust, smoothing out the top with a spatula.
- Bake in the preheated oven for 30-35 minutes, or until the filling is set but still slightly jiggly in the center.
Step 4: Cool and Serve
- Remove the pie from the oven and let it cool at room temperature for at least 2 hours.
- Before serving, sprinkle flaky sea salt on top for that perfect sweet and salty contrast.

Nutritional Information
Here’s a comprehensive look at the nutritional content per slice (1/8 of the pie):
| Nutrient | Amount |
|---|---|
| Calories | 290 |
| Protein | 4g |
| Carbohydrates | 38g |
| Fat | 14g |
| Fiber | 1g |
| Sodium | 150mg |
Healthier Alternatives for the Recipe
If you’re looking to make your Salted Honey Pie a bit healthier, consider these modifications:
- Sugar: Substitute granulated sugar with coconut sugar or a sugar alternative like stevia for a lower-calorie option.
- Butter: Use coconut oil or a plant-based butter for a dairy-free version.
- Crust: Replace graham cracker crumbs with oats or almond flour for a gluten-free crust.
Serving Suggestions
Here are some creative serving suggestions to elevate your Salted Honey Pie:
- Serve with a scoop of vanilla ice cream or whipped cream for added creaminess.
- Pair with fresh fruit, such as berries or sliced apples, for a refreshing contrast.
- Drizzle with extra honey or a caramel sauce for an indulgent touch.
Common Mistakes to Avoid
To ensure your Salted Honey Pie turns out perfectly, avoid these common pitfalls:
- Overbaking: Keep an eye on the pie during the last few minutes of baking. It should be set but still have a slight jiggle in the center.
- Not Cooling Properly: Allow the pie to cool completely before slicing to maintain its shape and texture.
- Skipping the Salt: Don’t underestimate the importance of salt in enhancing the flavors. A sprinkle on top makes a significant difference.
Storing Tips for the Recipe
Here’s how to store your Salted Honey Pie properly:
- Refrigeration: Store leftovers in an airtight container in the fridge for up to 5 days.
- Freezing: If you want to freeze the pie, wrap it tightly in plastic wrap and then in foil. It can last up to 3 months. Thaw overnight in the fridge before serving.
- Prepping Ahead: You can prepare the crust and filling a day in advance, then assemble and bake when ready.
Conclusion
In summary, the Salted Honey Pie is a delightful dessert that beautifully combines the sweetness of honey with a hint of salt, making it a perfect treat for any occasion. With just a few simple steps, you can create a show-stopping pie that will leave your guests asking for seconds. Try this recipe today, and don’t forget to share your feedback in the comments or subscribe for more delicious updates!
FAQs
Can I use other sweeteners instead of honey?
Yes! Maple syrup or agave nectar can be used as alternatives, but the flavor will differ slightly.
How do I know when the pie is done baking?
The pie is done when the edges are set and the center has a slight jiggle. It will firm up as it cools.
Can I make this pie ahead of time?
Absolutely! You can prepare the pie a day in advance and store it in the refrigerator.
How should I serve this pie?
Serve chilled or at room temperature, topped with whipped cream or a scoop of ice cream for added indulgence.
Salted Honey Pie: A Sweet and Savory Delight
Ingredients
- For the Crust:
- 1 ½ cups graham cracker crumbs
- 1/3 cup granulated sugar
- 1/2 cup unsalted butter, melted
- 1/4 teaspoon salt
- For the Cheesecake Filling:
- 16 oz cream cheese, softened
- 1 cup granulated sugar
- 1 teaspoon vanilla extract
- 3 large eggs
- 1 teaspoon ground cinnamon
- 1/2 teaspoon nutmeg (optional)
- For the Apple Layer:
- 2 cups apples, peeled and diced (Granny Smith or Honeycrisp work well)
- 1 tablespoon lemon juice
- 1/4 cup brown sugar
- 1 teaspoon cinnamon
- 1/4 cup caramel sauce (store-bought or homemade)
- For Topping:
- 1/2 cup chopped pecans or walnuts (optional)
- Extra caramel sauce for drizzling
Instructions
Step 1: Prepare the Crust
Preheat your oven to 325°F (160°C).
In a medium bowl, combine graham cracker crumbs, sugar, melted butter, and salt. Mix until well combined.
Press the mixture firmly into the bottom of a greased 9x13-inch baking dish. Bake for 10 minutes until lightly golden.
Step 2: Make the Cheesecake Filling
In a large mixing bowl, beat the softened cream cheese until smooth.
Gradually add granulated sugar and vanilla extract, mixing until well combined.
Add eggs one at a time, mixing well after each addition. Stir in cinnamon and nutmeg until incorporated.
Step 3: Prepare the Apple Layer
In a separate bowl, toss the diced apples with lemon juice, brown sugar, and cinnamon until evenly coated.
Step 4: Assemble the Bars
Pour the cheesecake filling over the baked crust, spreading it evenly.
Evenly distribute the apple mixture over the cheesecake filling, pressing down slightly.
Drizzle caramel sauce over the top and sprinkle with chopped pecans or walnuts if desired.
Step 5: Bake
Bake in the preheated oven for 30-35 minutes, or until the center is set and the edges are lightly browned.
Remove from the oven and let cool at room temperature for 30 minutes before transferring to the refrigerator.
Step 6: Chill and Serve
Refrigerate for at least 2 hours before cutting into bars.
Drizzle with additional caramel sauce before serving for an extra touch of sweetness.